Driver
Welcome to the comprehensive user guide for managing drivers within DataFuse AI. This guide is designed to provide clear, easy-to-follow instructions for users of all skill levels. Whether you are uploading, editing, or deleting data source drivers, this guide will help you navigate each task with confidence.
1. Introduction to Driver Management in DataFuse AI
What is Driver Management?
In DataFuse AI, Drivers are software components that enable the platform to connect to external data sources, such as databases, cloud storage, and Documents. Driver Management refers to the process of adding, updating, or deleting these drivers. Effective driver management ensures reliable connectivity to various databases and cloud services, supporting smooth and consistent data operations across the platform.
Key Benefits of Using DataFuse AI’s Driver Management
- Simplified Integration: Easily integrate with various data sources (e.g., PostgreSQL, MySQL, AWS, etc.) through the available drivers.
- Customization: Upload custom drivers not included in the default list, enhancing flexibility.
- Efficiency: Quickly access and manage all data source drivers from a single interface.
Real-World Use Cases
- Scenario 1: A user working with PostgreSQL data needs the proper driver to connect their database to DataFuse AI. The user can either download the default PostgreSQL driver(recommended) or upload their own custom one.
- Scenario 2: A data engineer wants to use a NoSQL database with a particular version and configuration, so they upload a custom driver that isn't available by default in the system.
2. What is a Driver?
A driver in DataFuse AI is a piece of software that enables the platform to communicate with external data sources. Think of it as a bridge that allows DataFuse AI to fetch, write, and manipulate data from different sources such as databases, cloud storage, or file systems.
Key Features of a Driver:
- Connection Management: Drivers establish secure and efficient connections between DataFuse AI and external data sources.
- Customizable: You can upload custom drivers for data sources that are not supported by the default list.
- Essential for Data Integration: Drivers enable the integration, synchronization, and manipulation of data across systems.
Without drivers, the platform cannot interact with external data sources. Each driver corresponds to a specific system, such as a database or cloud service, and allows DataFuse AI to read and write to that system seamlessly.
3. Supported Drivers
DataFuse AI supports a diverse set of drivers that enable connectivity to a wide range of data sources. These drivers are grouped by category, covering relational databases, NoSQL systems, cloud platforms, file storage, and specialized services.
Types of Supported Drivers:
| Category | Drivers |
|---|---|
| RDBMS | MSSQL, Oracle, PostgreSQL, MySQL, Snowflake, Redshift, SAP HANA, Vertica, Teradata, MonetDB, CockroachDB, MariaDB, IBM DB2 |
| NoSQL | BigQuery, Cassandra, Couchbase, MongoDB, Azure Cosmos NoSQL, Azure Cosmos MongoDB |
| AWS | RDS MariaDB, RDS MSSQL, RDS MySQL, RDS MySQL Aurora, RDS Oracle, RDS PostgreSQL Aurora, RDS PostgreSQL, RDS IBM DB2 |
| Azure | Azure MySQL, Azure PostgreSQL, Azure SQL Server, Azure Cosmos PostgreSQL |
| S3 | S3 |
| FTP / SFTP | FTP, SFTP |
| File | Upload |
DataFuse AI continually expands its driver library, adding new integrations to support emerging data sources.
4. How to Use Driver Management in DataFuse AI
Step-by-Step Instructions
Step 1: Navigating to Driver Management
- Locate the Driver Tab: On the main navigation sidebar, click the Driver tab. This will bring you to the Driver Management page, where you can view, upload, edit, and delete drivers.
Step 2: Viewing Available Drivers
-
Filter by Category: On the Driver Management page, drivers are organized into category tabs such as RDBMS, NoSQL, AWS, Azure, S3, FTP/SFTP, and File. Selecting a tab filters the list so you can quickly find drivers relevant to your data source type.
- RDBMS: Drivers for relational database systems. Includes: MSSSQL, Oracle, PostgreSQL, MySQL, Snowflake, Redshift, SAP HANA, Vertica, Teradata, MonetDB, CockroachDB, MariaDB, IBM DB2.
- NoSQL: Drivers for non-relational and distributed data stores. Includes: BigQuery, Cassandra, Couchbase, MongoDB, Azure Cosmos NoSQL, Azure Cosmos MongoDB.
- AWS: Drivers for Amazon Web Services–based databases and data platforms. Includes: RDS MariaDB, RDS MSSQL, RDS MySQL, RDS MySQL Aurora, RDS Oracle, RDS PostgreSQL Aurora, RDS PostgreSQL, RDS IBM DB2.
- Azure: Drivers for Microsoft Azure–hosted databases and data services. Includes: Azure MySQL, Azure PostgreSQL, Azure SQL Server, Azure Cosmos PostgreSQL.
- S3: Drivers for Amazon S3 object storage. Includes: S3.
- FTP / SFTP: Drivers for file transfer protocol storage sources. Includes: FTP, SFTP.
- File: Drivers for direct file uploads. Includes: Upload.

- Driver Information: The list of available drivers will show the driver name, version, and status (whether it is active or inactive). You can click on a driver to view additional details.
Step 3: Downloading a Default Driver
-
Download Button: Next to each driver in the list, you'll see the Download Default Driver button. Click this button to initiate a download of the selected driver file.
- Expected Behavior: The system will automatically download the corresponding .jar driver file to your computer.

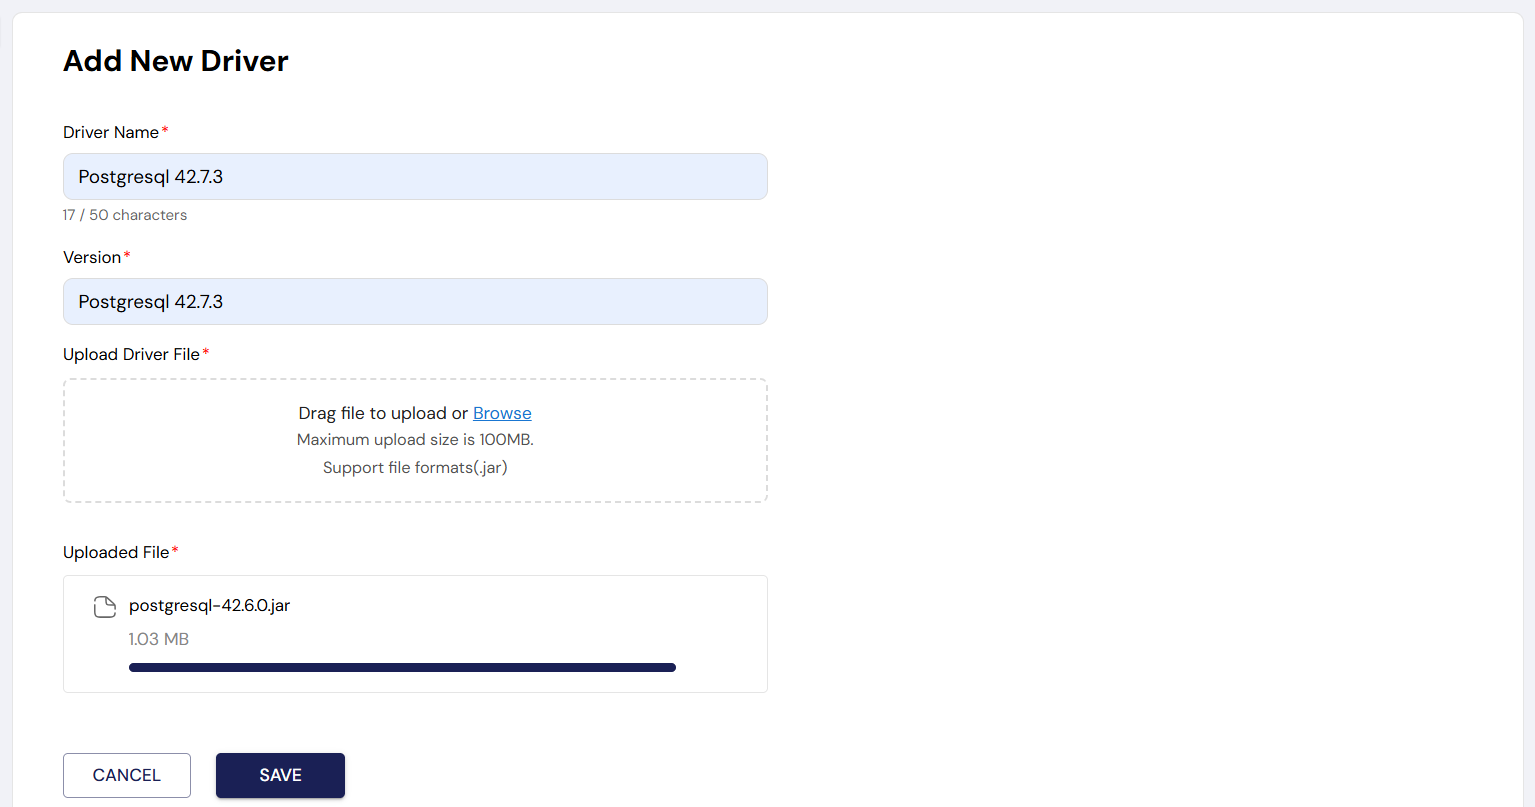
Step 4: Uploading a Custom Driver
-
Upload Button: Click the Upload Driver button at the top of the Driver Management page.
-
Select Driver File: A file picker will appear, allowing you to browse your local storage. Select the .jar file you wish to upload.
- Expected Behavior: Once the file is selected, the driver will be uploaded and listed among your drivers.
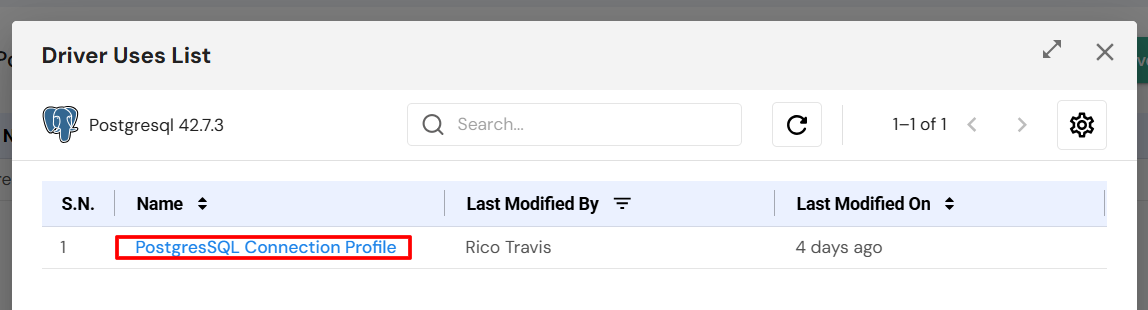
Step 5: Viewing Driver Use
-
View Uses: Next to each driver in the list, you'll see the View Uses button. Clicking this button opens a modal showing the connection profiles currently using this driver.
- Expected Behavior: A list of connection profiles appears, giving you insight into where and how the driver is being used in your system.
Step 6: Editing a Driver
-
Edit Button: Click the Edit button next to the driver you want to modify.
-
Modify Details: You can change the driver name, version, or upload a new file. Once you’ve made the desired changes, click Save to apply them.
- Expected Behavior: The updated details will be reflected in the driver list.
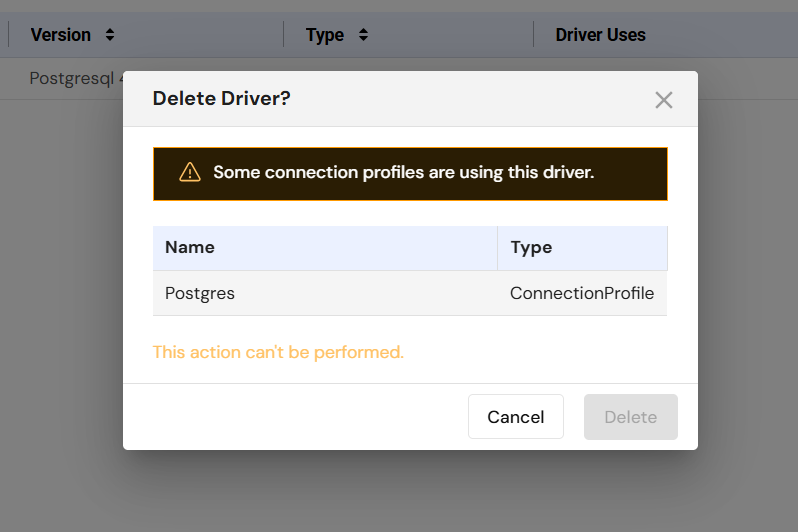
Step 7: Deleting a Driver
-
Delete Button: Click the Delete button next to the driver you wish to remove.
- Expected Behavior: If the driver is not in use (i.e., no connection profiles are using it), the system will delete the driver.
- Warning: If any connection profiles are using the driver, the system will prevent deletion and display a warning message.
5. Troubleshooting and Support
Issue 1: Driver Not Uploading
- Solution: Ensure that the file you are uploading is a .jar file and does not exceed the 100MB size limit.
Issue 2: Driver Deletion Fails
- Solution: If the driver is in use, it cannot be deleted. Check the connection profiles that are using the driver before attempting deletion.
Need Help?
- If you encounter any issues, please contact DataFuse AI support via email or live chat for assistance.
6. Glossary
- Driver: A software component that allows DataFuse AI to connect to external data sources.
- Version: The specific release of a driver, ensuring compatibility with data sources.
- Connection Profile: A configuration used to connect to a specific data source, which relies on a driver.
- Upload: The process of adding a custom driver to the system.
- Edit: Modifying the details of an existing driver (name, version, file).
This guide has provided you with the essential information to effectively manage data source drivers in DataFuse AI. With these instructions, you can confidently navigate through uploading, editing, and deleting drivers while ensuring your data connections remain smooth and efficient.