Job
1. Overview of the Module
1.1 Introduction
The Job Management Module in DataFuse AI is a pivotal feature that automates the execution of data pipelines by scheduling jobs. This module allows users to automate the repetitive execution of data processing tasks, making the workflow more efficient and reliable. The primary purpose of this module is to enable users to define specific schedules for running jobs, either automatically or manually, based on cron expressions. The module allows for both single and multiple pipeline executions, making it flexible for different types of data processing workflows.
What does it do?
The Job Management Module allows users to create and manage jobs that automatically execute pipelines at scheduled intervals. This functionality can be leveraged to run data processing workflows at precise times, ensuring data consistency, timely updates, and automated reporting.
Purpose in the ecosystem:
Within the broader DataFuse AI ecosystem, the Job Management Module plays a key role in orchestrating automated data workflows. By integrating seamlessly with other modules, it ensures that tasks such as data synchronization, transformation, and analysis are executed without manual intervention. The module interacts with both the Data Pipeline and Scheduling systems, tying them together for a streamlined and automated experience.
Primary Objectives and Functionality:
- Automated Pipeline Execution: Allows users to schedule and execute data pipelines without manual intervention.
- Job Scheduling: Leverages cron expressions or pre-defined intervals to automate job execution.
- Pipeline Management: Supports single or multiple pipeline executions, with the ability to add dependencies in future releases.
- Manual Job Trigger: Users can trigger jobs manually for testing or immediate execution.
- Config Management: Provides the ability to enable, disable, or delete jobs, ensuring full control over job execution.
1.2 Why is it Important?
Significance:
The Job Management Module is crucial for automating workflows in a data-driven environment. By automating the execution of pipelines, it significantly reduces the risk of human error and operational overhead. Instead of relying on manual execution, jobs can be scheduled to run at precise times, allowing data scientists, analysts, and engineers to focus on higher-level tasks.
Problems it Solves/Improvements it Offers:
- Time Efficiency: Automating pipeline execution saves considerable time by removing the need for manual intervention.
- Reliability: Automated jobs ensure that pipelines run consistently, reducing errors related to human oversight.
- Scalability: As data operations scale, scheduling more jobs to run at specified intervals allows for efficient resource management and system performance.
- Customization: With cron expressions, users can fine-tune the timing and frequency of job executions to meet specific needs.
1.3 Key Features in the Module
Feature 1: Job Creation and Configuration
- What it does: This feature allows users to create jobs by defining job names, types (single or multiple pipelines), and associated pipelines. Jobs can also be enabled or disabled based on the user’s needs.
- How it benefits users: Simplifies the process of job setup, allowing for easy pipeline integration and configuration. Users can quickly automate data tasks without deep technical knowledge.
Feature 2: Scheduling with Cron Expressions
- What it does: Enables the scheduling of jobs using cron expressions, providing advanced control over job execution timings. The system can also generate cron expressions via a UI interface for less experienced users.
- How it benefits users: Users can precisely define when jobs should run, including complex schedules, ensuring that jobs execute at the most optimal times for their operations.
Feature 3: Job Execution Control
- What it does: Provides the ability to manually run jobs outside of their scheduled time. This allows users to test jobs or execute them based on immediate needs.
- How it benefits users: Ensures flexibility in job execution, making it easy to initiate job runs manually for testing or ad-hoc scenarios.
Feature 4: Job Notifications
- What it does: Sends notifications when a job starts, succeeds, fails, or encounters a duration warning. Notifications can be configured based on job status to alert users of important events.
- How it benefits users: Keeps users informed about job performance, enabling quick responses to failures or delays. This improves overall system reliability and troubleshooting.
Feature 5: Job History and Task Monitoring
- What it does: Tracks and displays the historical runs of jobs. Each run includes a list of tasks executed, along with their status.
- How it benefits users: Users can easily monitor the history of their jobs, providing insight into job performance, and enabling them to quickly pinpoint issues when they arise.
1.4 Real-World Usage
Examples of Usage:
- Data Sync: Automating the synchronization of data between systems, such as syncing a database every night to ensure that the latest data is available for downstream applications.
- ETL Pipelines: Automating Extract, Transform, Load (ETL) processes for regular data transformations or loading of new datasets into data warehouses.
- Scheduled Reports: Automating the generation of reports or dashboards at specific intervals (e.g., weekly summaries or monthly performance reports).
2. Module Concepts
2.1 Job
A Job is a scheduled unit of work that executes one or more data pipelines. Jobs are created by users to automate processes and can be configured with specific timings using cron expressions or through the UI.
Use Cases:
- Automating regular data imports from external sources.
- Scheduling reports to run periodically.
- Ensuring that routine data cleaning or transformation tasks are executed on a timely basis.
2.2 Job Run
A Job Run refers to the instance in which a job is executed. Each job run contains details about its start,end time, execution duration time, success or failure status, and the status of any tasks(pipeline) involved.
Related Concepts:
- Task Status: Each task within a job run is monitored and reported. Task status can be success, failure, cancelled or in-progress, and provides insight into job execution quality.
2.3 Tasks
Tasks represent individual actions or steps within a job run. Each task typically corresponds to a single pipeline that is executed as part of the job.
Related Concepts:
- Pipeline Status: Similar to task status, the status of a pipeline can indicate whether it completed successfully or encountered errors during execution.
3. Module UI Components and User Actions
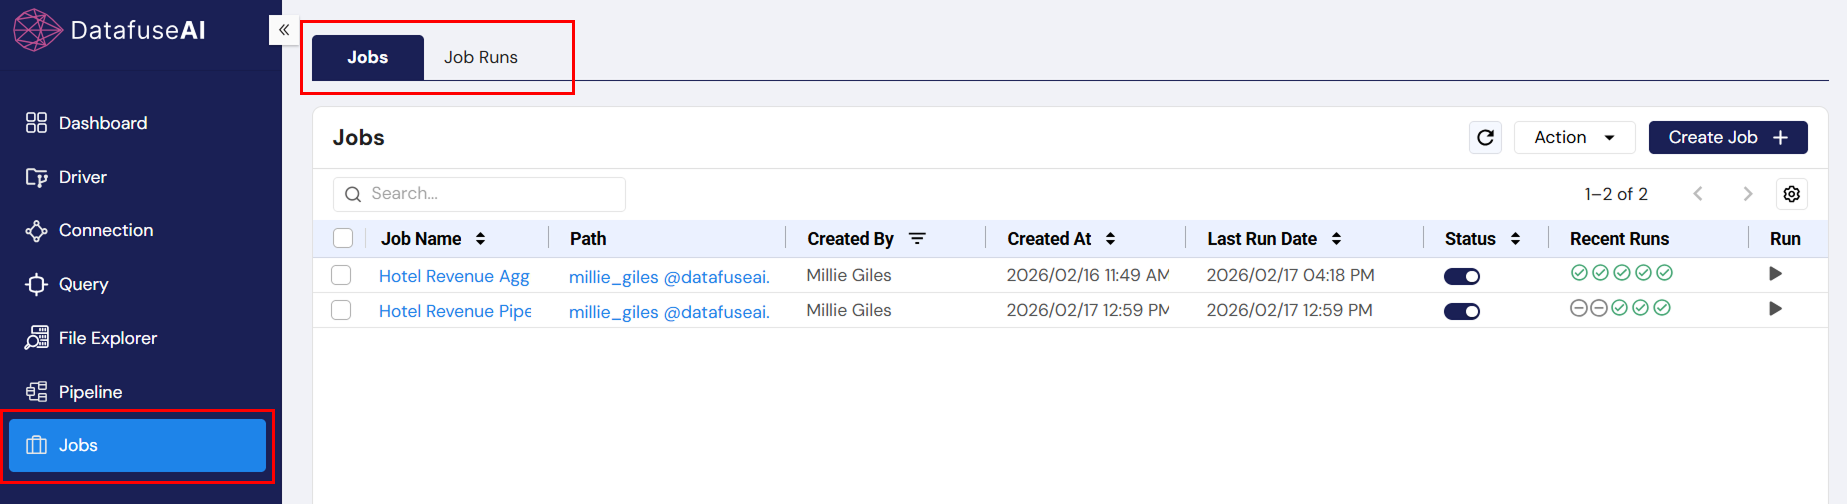
3.1 Jobs Tab
-
UI Component: Search Bar
- Description: The search bar allows users to filter the list of jobs by name. Typing into the search bar will instantly filter the displayed jobs based on the entered query.
- User Action: Type job name or part of the name to quickly locate a specific job.
-
UI Component: Actions Dropdown
- Description: Each job in the list has associated actions: Edit, and DeleteJob.
- User Action: Click to edit job configurations, delete the job temporarily (move to trash).
-
UI Component: Create Job Button
- Description: This button initiates the creation of a new job.
- User Action: Click to begin the process of creating a job, including defining its schedule, pipelines, and configurations.
-
UI Component: Status Toggle
- Description: A toggle that enables or disables the job. Disabled jobs will not execute according to their schedule until re-enabled.
- User Action: Toggle on or off to control whether the job is actively scheduled or temporarily paused.
-
UI Component: Run Icon Button
- Description: An icon button that allows users to manually trigger a job to run, regardless of its scheduled time.
- User Action: Click the button to immediately initiate job execution.
-
UI Component: Notification Button
- Description: A button that configures notifications for job events, such as success, failure, or duration warnings.
- User Action: Click to enable or disable notifications for job status changes.
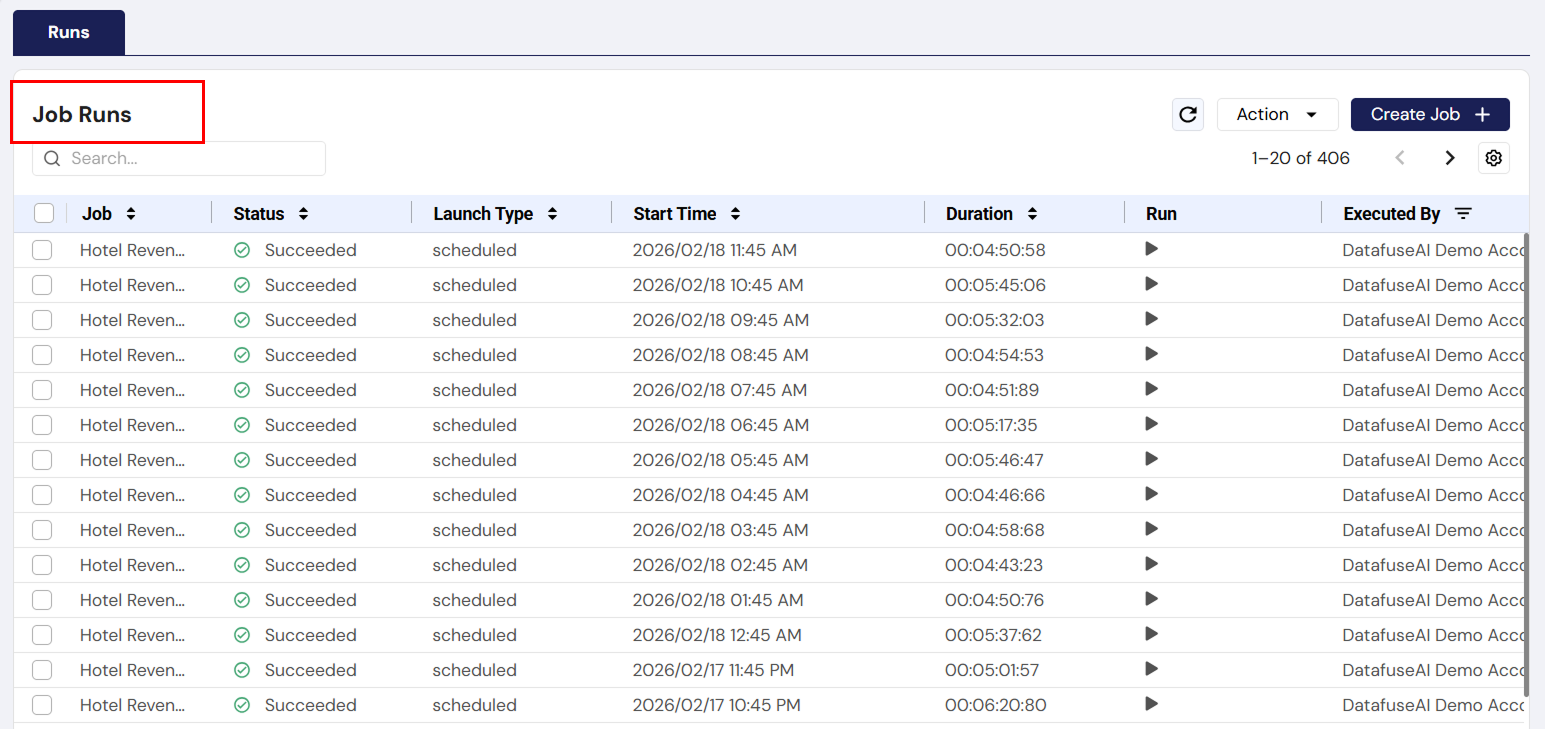
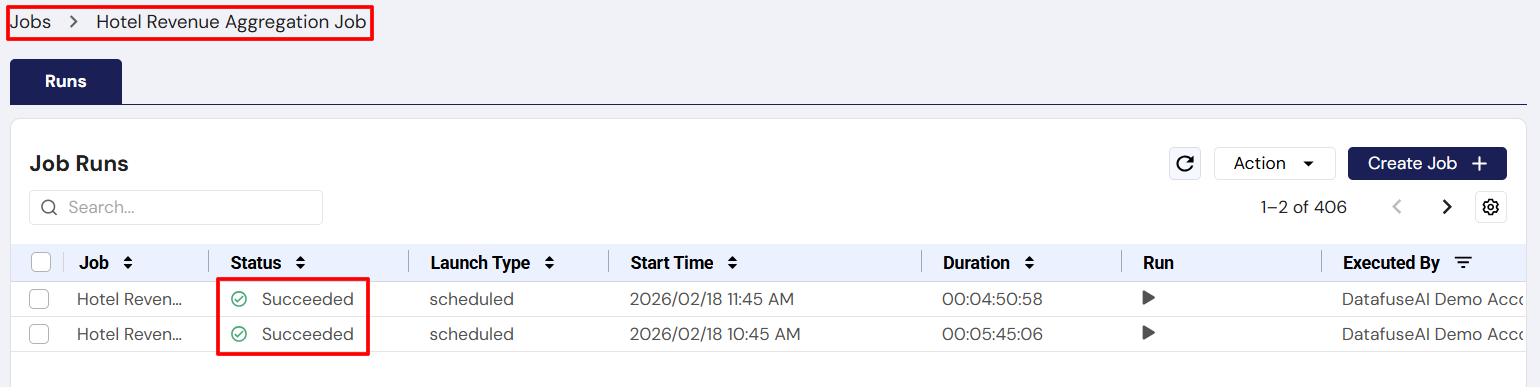
3.2 Runs Tab
-
UI Component: Job Run List
- Description: Displays a history of all runs for a selected job. Each entry includes the run's start time, status, and any associated errors or success indicators.
- User Action: Click on a run to view its detailed status, including task information.
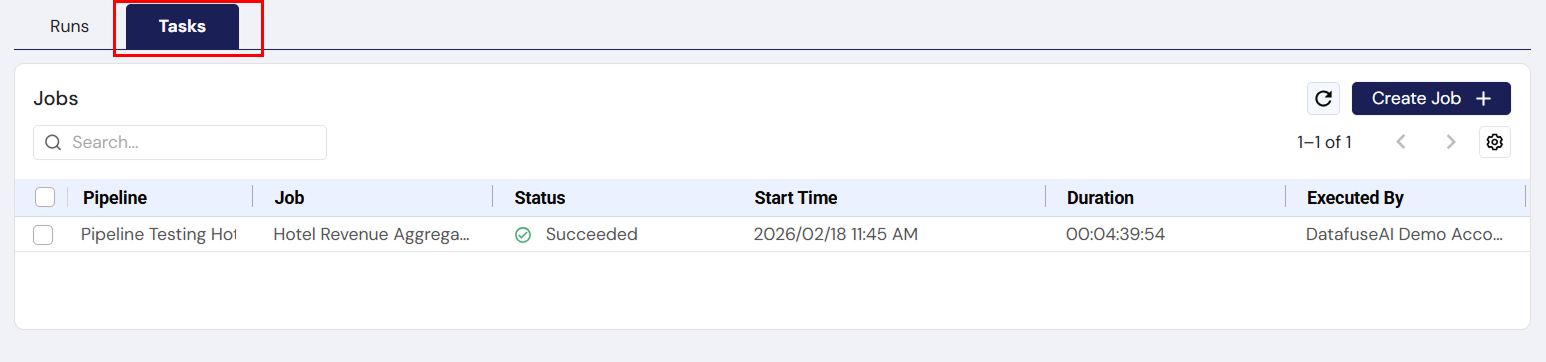
3.3 Task Tab
-
UI Component: Task List
- Description: Lists all tasks executed within a selected job run, showing their respective statuses.
- User Action: Click on a task to view more detailed information, such as logs or task-specific errors.
4. Standard User Flow
To begin working with jobs in the DataFuse AI platform, navigate to the Jobs Tab from the left-hand navigation bar. This opens the Job Management interface, where you can create, manage, and monitor jobs throughout their lifecycle.
Creating and Scheduling a Job
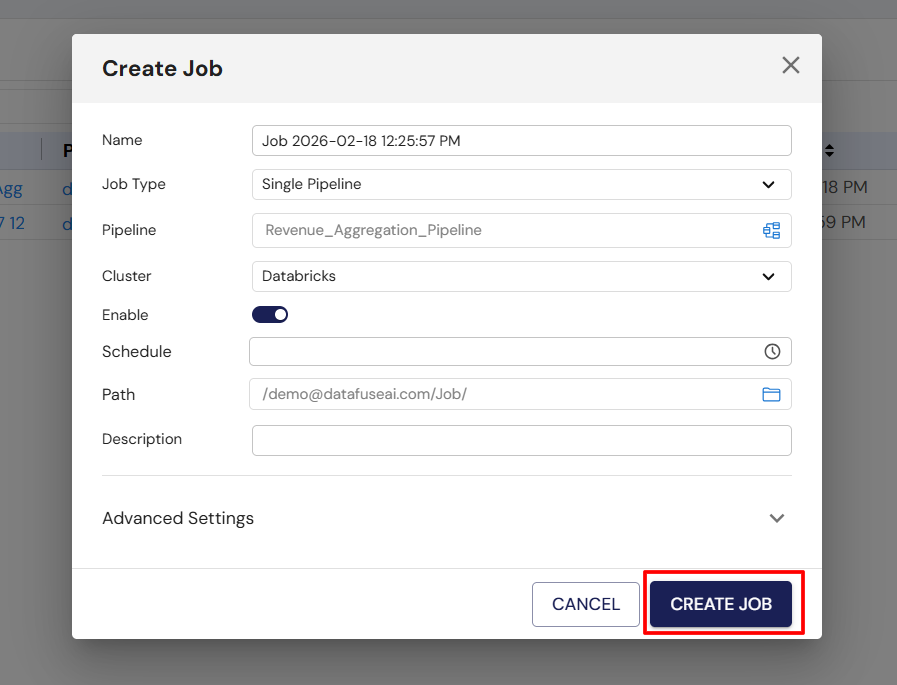
In the Jobs Tab, click on the Create Job button to start setting up a new job. A form will appear where you’ll define the key job parameters:
-
Job Name: Choose a meaningful name for the job to help identify it easily later.
-
Job Type: Select the job type depending on how you want the pipelines to execute:
- Single: Executes a single pipeline.
- Multiple: Executes multiple pipelines in parallel.
- Conditional: Executes multiple pipelines based on specific dependencies (planned for future updates).
-
Pipeline Selection: Choose the pipeline(s) you want this job to run. You can select from existing pipelines that have already been created.
-
Cluster: Select the engine or cluster where the job will be executed.
-
Job Description (optional): You can provide a description to make it easier to identify the job’s purpose.
Along with these job details, you will also need to configure the job schedule. You can either:
- Select from predefined scheduling options such as Daily, Weekly, or Monthly, or
- Define a custom cron expression for more precise control over the execution timing.
Once all the necessary fields are filled in, click Create Job to save the configuration and create the job. At this stage, the job is set up with its schedule and is ready for execution based on the defined timings.
Enabling the Job
After creating and scheduling the job, you need to enable it to make sure it runs according to the set schedule. In the Jobs Tab, you can toggle the Status Toggle to enable or disable the job. If the job is enabled, it will run according to the specified schedule. If it is disabled, the job will be paused and will not execute until re-enabled.
Monitoring the Job’s Execution
Once the job is created and enabled, you can monitor its execution and status to ensure everything is running smoothly:
- The Jobs Tab will show an overview of all jobs, including whether they are enabled or disabled, and you can edit, manually run, or delete jobs as needed.
- The Job Runs Tab provides a detailed history of all job executions. By selecting a specific job, you can view the status of each run, including timestamps and whether the job succeeded or failed.
For each job run, you can also check the status of the individual tasks within the run. If any task encounters issues, you can review the logs for troubleshooting. Additionally, you can configure notifications to alert you about job events such as start, success, failure, or duration warnings, keeping you informed about the job's progress and performance.
Managing the Job
If you need to adjust or remove a job, you have several management options:
- Disable the Job: If the job is no longer needed temporarily, you can disable it by toggling it off. The job will not run until you manually re-enable it.
- Move to Trash: If the job is no longer required, you can move it to the Trash by selecting the Delete option. This deletes the job temporarily and allows you to restore it if necessary.
- Permanently Delete from Trash: If you're certain the job is no longer needed, you can permanently delete it from the Trash. Once deleted, the job cannot be recovered, so make sure this action is final.
This streamlined flow covers the full process of job creation, scheduling, monitoring, and management, providing a flexible and efficient way to automate and control data workflows in DataFuse AI.
5. Crucial Guides for Users
Properly creating and scheduling jobs is key to ensuring your data pipelines run efficiently and seamlessly in DataFuse AI. Below is an overview of the process for setting up and configuring your job, with a focus on selecting the correct pipeline and defining an appropriate schedule.
For a more detailed, step-by-step guide, refer to the Create and Schedule Your First Job documentation. This comprehensive guide will walk you through each stage of job creation, from setting parameters to executing jobs on your desired schedule, helping automate your pipeline workflows effortlessly.
Creating and Scheduling a Job: An Overview
-
Navigate to the Jobs Tab:
- Start by logging into DataFuse AI and clicking on the Jobs Tab in the left-hand sidebar. This will bring you to the Job Management interface, where you can view and manage all your jobs.
-
Create a New Job:
-
Click the Create Job button to open the job configuration form. Here, you will define key details for your job:
-
Job Name: Choose a meaningful name for easy identification.
-
Job Type:
- Single: Executes a single pipeline.
- Multiple: Runs multiple pipelines in parallel.
- Conditional: A planned feature that will support jobs with dependencies between multiple pipelines (currently unavailable).
-
Pipeline Selection: Choose the specific pipeline(s) to be executed by this job.
-
Cluster Selection: Choose the engine or cluster (e.g., Databricks) where the job will run.
-
Job Description (optional): Add a description to help identify the job later.
-
-
-
Set the Job Schedule:
-
In the same form, set the schedule for when you want the job to run:
- Predefined Scheduling Options: Choose from Daily, Weekly, or Monthly options. The system will automatically generate a cron expression for these.
- Custom Cron Expression: If you need more control over the timing, enter a custom cron expression. Cron expressions allow precise control over the schedule.
-
-
Enable the Job:
- Make sure the job is enabled by selecting the "Enable" option. When enabled, the job will run automatically according to the schedule you’ve defined. You can also disable it later if needed to temporarily stop execution.
-
Save the Job:
- Once all the necessary details are filled in and the schedule is set, click Create Job to save your configuration and create the job.
-
Job Execution:
- Once the job is created and enabled, it will automatically run according to the schedule you set. You can also manually trigger the job at any time by clicking the Run Icon in the Job Management Interface.
For more in-depth instructions on setting up and scheduling your job, please refer to the Create and Schedule Your First Job guide. This step-by-step guide covers everything you need to know, from configuring job parameters to executing jobs based on your specific schedule.
- Engine Availability: Before scheduling a job, ensure that the selected engine (e.g., Databricks) is available at the time the job is scheduled to run. If the engine is unavailable, the job will not execute as expected.
- Job Frequency: Be mindful of how frequently you schedule jobs. Avoid setting jobs to run too often (e.g., every minute) as this can lead to excessive resource consumption and performance issues. A daily or weekly schedule is generally ideal for most use cases.
Now that you understand the basic process of creating and scheduling jobs, you can explore advanced features such as custom cron expressions, pipeline dependencies, and job notifications to enhance your automated workflows within DataFuse AI.
6. Common Troubleshooting in the Module
6.1 Troubleshooting Tips
Issue 1: Job Not Running as Scheduled
If your job isn't running as expected, follow these steps:
- Check the Job’s Status: Ensure the job is enabled in the Jobs Tab.
- Verify the Schedule: Double-check the cron expression or schedule settings to ensure they're configured correctly.
- Engine Availability: Confirm that the selected engine (e.g., Databricks) is available and operational.
- Resource Availability: Ensure sufficient resources are available on the engine to run the job.
- Job Frequency: Avoid scheduling jobs too frequently, as this could lead to performance degradation or resource exhaustion.
- Permissions: Verify that the user account has the necessary permissions to execute the job.
Issue 2: Job Runs but Fails During Execution
If the job runs but fails during execution, follow these steps:
- Check Task Logs: Review the logs in the Task Tab for any error messages or details on what went wrong.
- Pipeline Errors: Verify that the associated pipeline is not encountering any issues. Check the Pipeline Tab for any errors.
- Timeout Settings: Ensure the job's execution time is within the expected duration. Adjust timeout settings if needed.
- Data Quality: Check if the input data is properly formatted and free from any inconsistencies or issues that might cause the job to fail.
Issue 3: Notifications Not Received
If you're not receiving notifications about the job's execution:
- Check Notification Settings: Confirm that notifications are enabled for the job in the Job Tab.
- Email Settings: Make sure your email is correctly configured in your profile settings to receive notifications.
- Notification Frequency: Ensure that your notification settings are configured to send alerts for the right events (e.g., success, failure, warnings).
6.2 FAQ
How do I trigger a job manually?
- Navigate to the Jobs Tab and locate the job you want to trigger.
- Click the Run Icon next to the job name.
- The job will execute immediately.
Why isn’t my job running after I’ve scheduled it?
- The job might be disabled. Ensure the Status Toggle is set to "enabled."
- Double-check the cron expression or schedule to ensure it's configured correctly.
- Verify that the selected engine is available to execute the job.
What should I do if my job is stuck in the "Running" state?
- Review the Task List for tasks that might be taking longer than expected.
- Check for potential resource bottlenecks on the engine.
- Inspect the logs for any errors or issues causing the job to hang.
How can I delete a job permanently?
- Go to the Jobs Tab and locate the job you want to delete.
- If the job is in the Trash, go to the Trash Folder from File Explorer and click Permanently Delete/Empty Trash to remove it from the system.
- Once deleted, the job cannot be recovered.
Can I modify a job's schedule after it’s been created?
Yes, you can modify the schedule:
- Navigate to the Jobs Tab and click Edit for the job.
- Adjust the schedule or cron expression as needed.
- Save the changes, and the job will run according to the new schedule.
What happens if my cron expression is invalid?
The job will not run, and the system will display an error indicating the issue. Double-check the cron expression for correct syntax.
This troubleshooting guide addresses common issues with the Job Management Module. For additional support or unresolved issues, refer to error messages in the UI or contact support for assistance.
7. Conclusion of the Module
7.1 Summary
The Job Management Module is designed to simplify the automation of data pipeline executions. It empowers users to easily create, configure, and manage jobs with the flexibility to schedule them based on cron expressions or predefined intervals. With manual execution capabilities and customizable notifications, this module is a powerful tool for automating and optimizing data workflows, ensuring smooth operations and efficient use of resources.
7.2 Additional Notes
- Job Frequency: Avoid scheduling jobs too frequently, especially on short intervals (e.g., every minute). Frequent job executions can lead to high resource consumption and performance bottlenecks. Consider daily or weekly schedules based on the nature of the task to optimize system performance.
- Engine Availability: Ensure that the selected engine (e.g., Databricks) is available at the scheduled execution time. If the engine is down or unavailable, jobs may fail to run or experience delays.
- Resource Management: Monitor resource allocation, especially when running multiple jobs in parallel. Insufficient resources or engine overloads can impact job performance and execution times.
- Job Dependencies (Future Feature): Future updates will support conditional jobs with dependencies. This will enable more advanced automation scenarios, where the execution of one job can depend on the success or failure of another job.
- Job Notifications: Set up appropriate notifications to stay informed about job statuses such as success, failure, or warnings. This ensures you can react quickly to any issues and keep track of job performance.
- Job History & Logs: Regularly review the Job History and task logs to ensure your jobs are running smoothly. Historical logs provide valuable insights into job execution times and any recurring issues, enabling you to fine-tune and optimize your workflow over time.
- Managing Job Lifecycle: If jobs are no longer needed, remember to disable them or move them to the Trash to avoid cluttering the system. For jobs that are no longer required, consider permanently deleting them to maintain a clean and organized job management environment.
By keeping these best practices and tips in mind, you can ensure efficient use of the Job Management Module, keeping your data workflows automated, reliable, and optimized for performance.
8. What's Next After This Module?
8.1 Future Features
- Conditional Jobs: In upcoming updates, the Job Management Module will support conditional jobs. This feature will allow jobs to have dependencies, meaning one job's execution can depend on the successful completion of another. This will enable more complex and dynamic workflows.
8.2 Integration with Other Modules
- The Job Management Module integrates seamlessly with the Pipeline Module, allowing you to automate the execution of data pipelines. This integration ensures that jobs trigger pipeline executions smoothly, creating an end-to-end automated workflow for data processing, transformation, and analysis.
8.3 Next Steps
To continue expanding your knowledge and capabilities within DataFuse AI:
- Learn How to Create Your First Job: Follow the next guide to set up your first job, configure its schedule, and automate your workflows.
- Learn How to Create Your First Pipeline Understanding how to build pipelines is key to using the Job Management Module effectively. Explore how to design and implement pipelines that perform tasks like data extraction, transformation, and loading.
- Dive Deeper into Core/Pipeline Modules: Understand the core concepts and advanced features of the Pipeline Module, which is integral to building robust and scalable data workflows.
- Master Cron Expressions For advanced scheduling and more precise control over job timings, dive into the details of Cron Expressions. Learn how to define complex schedules that fit your unique automation needs.
By exploring these next steps, you'll gain deeper insights into automating and optimizing your data workflows, creating more sophisticated jobs and pipelines to drive efficiency and performance in your data-driven projects.